Miniatures Painting Hints
The
Napoleonic Guide is proud to give you these tips
from no lesser personage than Anthony Barton - one
of the creators of the highly acclaimed AB range of
miniatures figures.
Napoleonics
 People
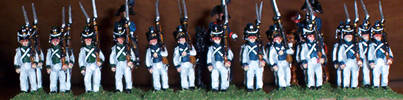
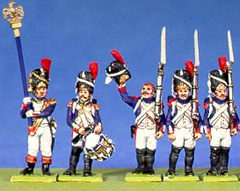
often ask how I paint my figures, such as the ones
shown on the right. People
often ask how I paint my figures, such as the ones
shown on the right.
Obviously
special care has been lavished on these, but I hope
the following may be generally useful.
Glue your soldiers to flat sticks or individual blocks
of wood to hold them whilst painting - I generally
put 10 or so on to an 8 inch stick with UHU glue which
can be broken easily when finished.
Use
a thin undercoat of white enamel, sprayed or brushed.
Some prefer black, but I find it kills the luminosity
of the lighter colours laid over it.
Keep your colours a shade lighter than they would
be for real. Colours appear paler when seen from afar
- the "scale distance" effect. This applies to small
figures as well as vehicles.
Aim
for maximum contrast. We all know that soldiers were
filthy on campaign, but this effect is difficult enough
to achieve with large figures and best abandoned with
small ones. You can always add some mud later on.
Paint:
The
choice of enamel or acrylic is up to you. I use Humbrol
acrylic for speed and flexibility, but enamels for
undercoating and metallics - the white and yellow
are also better than the acrylic alternatives.
Brushes:
Since acrylic paints clog up any brush eventually,
I regard them as disposable and use nylon (in UK,
Pro-Arte Prolene). These are much cheaper than sable,
which tend to be of poor construction these days.
Cherish the brush with a fine point and keep it for
lining out. A fine point on a large brush is of more
use than any number of really small brushes.
Painting:
Block in the main colours carefully over the white
undercoat, leaving the belting and any light facings
or trousers untouched. Care taken at this first stage
reduces repainting later. When everything is coloured
in I then `line out all the parts of the figure,
putting a fine line between everything. Use a darker
version of the colour you are working over: black
over blue; brown over red; grey over white. You will
need a brush with a very fine point and this part
is fiddly, but it articulates the whole figure and
brings it to life. Finish off by touching up any white
items and adding the metallics such as buttons and
shako plates. The detail on metalwork can be picked
out by flushing with an orange-brown.
Faces:
The part most people find difficult. I use a matt
flesh as undercoat, then pick out the features with
a light orangey-red mixture of gloss tan and matt
red - you can flush this into the detail if you keep
it light and thin enough. Eyes and hair are then touched
in with a dark red-brown, for which I mix gloss black
and matt red.
Black:
Use matt, satin and gloss to contrast the different
black materials - add a little red to leatherwork.
Matt cloth or felt should be lightened a little to
a very dark grey.
Red:
Usually too strong as bought - add a little white
and tan to lighten and fade. In British units you
can contrast the brick-red of soldiers and the scarlet
(add yellow) of officers.
Blue:
Dark blue uniforms were dyed with indigo, which has
an almost violet tint. Try adding red to your dark
blue paint to create this shade. If you add yellow
to this mixture, you get dark green.
White
Uniforms, particularly for Austrians and Saxons:
Make your ground cover a silver-grey; contrast this
with the belting, a very pale buff. Line out with
a grey-brown.
Horses:
Artists acrylics in tubes give the best shades: Light
Red, Burnt Siena, Burnt Umber. Mix these with Earth
or Tan for better coverage. Most brown or bay horses
have darker legs and noses. For black horses use satin
black with red added. For white horses, paint them
light grey, darken the lower legs and nose with a
darker grey, then highlight with white.
Firearms:
Dark, glossy brown. Pick out the barrel and bayonet,
etc. with silver, to which a little black may be added.
Line out with gloss black.
Flags:
Buy a paper one!
The
Napoleonic Guide suggests two Internet sources
of free Napoleonic flags. Click
here for details.
Tips
courtesy of Anthony Barton so be sure to check out
the AB website
|